
Migration. It’s not just for animals heading south this winter. Sometimes we need to migrate our files within the infrastructure. Let us help make migrating your file server shares to a newer server OS in a virtual environment easy.
Say you have a Windows Server 2003 file server with all the company’s data on it and you need to get it to the latest OS. There is not an in-place upgrade option for Windows Server 2003 to 2008 R2 or greater 64-bit operating systems, and we typically advise against doing them anyway. You do not want to clone the drive and DFS is not a viable option. Having virtual servers and storage makes this easier to complete so you won’t be left out in the cold during this migration season.
To migrate the data and shares, you will create a new server with the OS you want to use. From there, attach temporary storage drives and recreate your folder structure and shares to test. Disconnect your virtual drives from your new server and swap them with your 2003 server and reconnect to reestablish your shares and data.
Here are the step by step instructions:
- Create a new server.
- Attach temporary drives as space holders.
- C: (New OS)
- D: (Space holder for 2003 servers D: with shares)
- Patch the new server.
- Join it to the domain.
Optional Placeholder Shares
On the new server, temporarily map drives to old server.
Note: You can skip these steps. However, if you do, you cannot test your shares before you reattach your old data drive.
Net Use Drive letter source example = Net Use G: \\oldserver\d$
Once you have the drive mapped, you can now recreate the folder structure using Robocopy. The following command will create the structure without copying permissions or data:
Robocopy G: D: /zb /e /xf *
Now that you have the structure in place you can now export the shares from your 2003 server.
- On the old 2003 server, open Registry Editor and browse to the following:
- HKLM> SYSTEM> CurrentControlSet> Services> LanmanServer> Shares
- Right click “Shares” and select “Export”
- HKLM> SYSTEM> CurrentControlSet> Services> LanmanServer> Shares
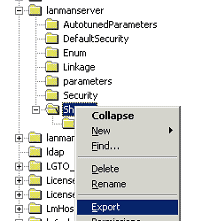 Export only the Selected branch and name it “Shares.reg”:
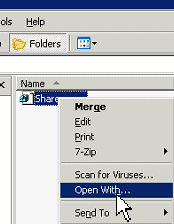
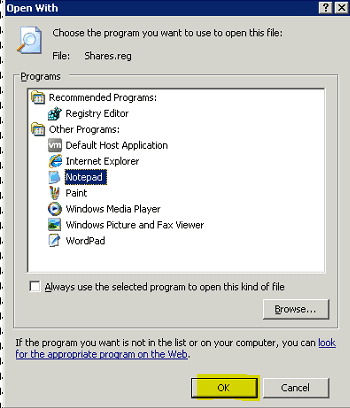
 6. Copy the Shares.reg file to your new server. Edit the file using Notepad to confirm it is only the registry branch you need.
 It should look similar to this. If not, make sure you only exported the branch. If you import more than the branch you can corrupt your OS completely.
 Note: The file does not show paths in a readable format it will be all numbers.
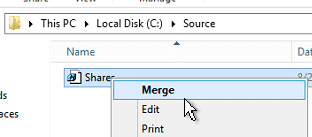
- Import/merge the registry export into your new server:
 Now browse to the registry key on the new server:
- HKLM> SYSTEM> CurrentControlSet> Services> LanmanServer> Shares
- It should be populated with the old shares from the 2003 server in the registry.
- HKLM> SYSTEM> CurrentControlSet> Services> LanmanServer> Shares
Note: They will not show up until you restart the server.
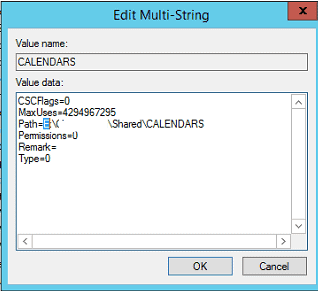
If the drive letters change you will have to manually change the paths by clicking on each registry key and revising the path. See the example below where I need to change Path=E: to D:
 If you have to change the path in the registry as shown above I would recommend another restart after you change them all.
- If you created the Placeholder Shares above, you can now test your shares and confirm they are working properly. If all the shares are working as expected, you can then disconnect the placeholder drive using your virtual host.
- Shut down the 2003 server and disconnect the drive using the virtual host.
Caution: DO NOT DELETE the drive — just disconnect it from the VM.
- Connect the drive to the new server using the virtual host manager.
- Enable the drive-in disk manager on the new server and you should be able to browse your old 2003 data on your new server.
- Restart the server again and then test your network shares. It will import the NTFS permissions from the 2003 server. If you are on the same domain, they will be easily readable.
Congratulations! You just moved your file shares to a new server OS!
Note: You may need to create a DNS alias that points to the new server IP using the old server’s name (if the old server is offline) to avoid recreating paths throughout your domain.
Caution: Do not attempt to bring that old 2003 server back on the network if you have a DNS alias. Additionally, if you have both systems online, devices may point to the old and new and get your data out of sync.