
 Sometimes it’s necessary to change an internal client’s IP address to talk with the internet. For instance, it is always important to make sure your SMTP server is using the same outbound IP used for inbound traffic — I’ve seen this cause a good many mail servers to be blacklisted by ISPs. This technique has a variety of benefits: you can NAT into this IP (IP pool) only when going to a certain destination. For example, if you had to change your source IP when accessing a destination across a VPN tunnel. That could be very useful in the medical field — you almost always have to NAT your private traffic to a public address when accessing the VPN hosts.
I’ll walk you through how to change the IP the client is using for outbound NAT within a FortiGate on FortiOS 5.2 (although the steps should be the exact same in 5.4 other than how the interface looks).
So, let’s get to it!
Here we’ve got the internal client address at 10.64.16.10 and the external IP as 1.1.1.1. In this example I only want this one internal client to be NATed out of 1.1.1.1.
First, create a Virtual IP pool. Go to Policy & Objects, then Objects and select IP Pools:

Now you can set up the pool. Notice the options available:
- Overload allows PAT, which creates many IP addresses to one public address
- One-to-One allows one IP to that public IP only
- NAT into a Public Range of addresses
You will also want this device to answer VIA Arp for 1.1.1.1, so create your IPv4 Policy to allow our private IP address to be allowed to the internet (WAN1) and to be NATed via this IP pool. I created the address object for my private host already:
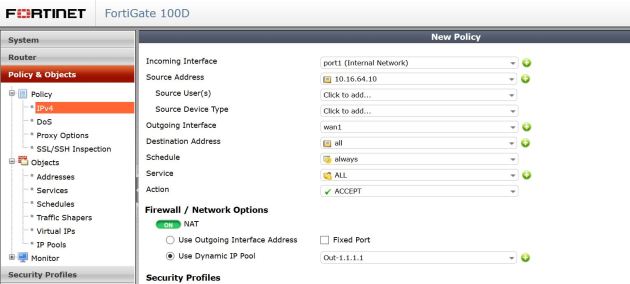
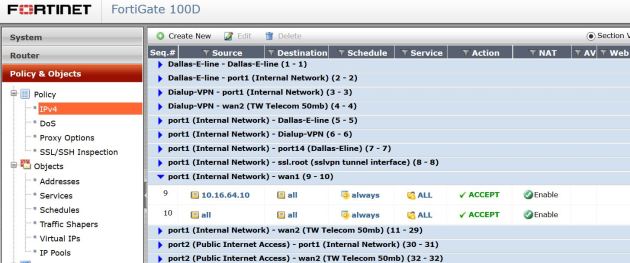
So, after creating your IPV4 policy, you have one thing left: make sure this is one of your first policies hit when 10.16.64.10 tries to access the internet. Put it at the top of your list, or at least above the default NAT rule:
That’s it! If you go to a site such as ipchicken.com or whatismyip.com, you should see 1.1.1.1 if you are coming from 10.16.64.10.