
Running Windows 10 with OneDrive Next Gen Sync client in a non-persistent VDI environment is challenging on the backend storage as well as on internet bandwidth. Essentially, OneDrive makes a local copy of your files that are hosted in the cloud, so it downloads files from the internet and writes them to the C drive of your desktop.
What does this mean for your VDI infrastructure when using non-persistent desktops?
Non-persistent desktops get re-created frequently, which means the data on the C drive is deleted and re-created from a master image. If OneDrive’s local data is being deleted during a refresh or re-compose operation, then the next time a user logs on to a desktop, OneDrive’s sync engine will see that it needs to re-download all of its files back down to the C drive. This can compound very quickly depending on how many users are in the environment and how often the machines are being rebuilt. Some pools are set to delete the machine or refresh after each logoff and build a brand-new machine every time. In a nutshell, OneDrive will create a ton of backend IO on the SAN as well as consume much more internet bandwidth on a very frequent basis if left unchanged on a non-persistent desktop.
Another issue is that OneDrive puts the local folder in the user profile directory. This is also problematic in non-persistent VDI when using a roaming profile or UEM solutions. Each user can potentially have up to a terabyte of storage capacity for OneDrive. Can you image how big a user profile would grow to if the local OneDrive folder stays in its default location? This can cause major performance problems with logons and logoffs in non-persistent environments.
Fortunately, Microsoft has provided a method of changing the default location of the local OneDrive folder using Group Policy. The instructions for setting this up can be found here. Unfortunately, this Group Policy setting only allows you to select a location on the local C drive. So, this still means we have all the same infrastructure challenges.
Luckily, we’ve figured out a workaround that allows you to provide your users their OneDrive accounts in a non-persistent VDI environment without completely obliterating your infrastructure.
At the onset, I chose to tackle this solution using symbolic links to trick OneDrive into thinking that a folder is local, while the folder is on a network share. With that said, this setup is most likely not supported or advised by Microsoft. Unfortunately, they haven’t given us many configuration options, so we do what we must. I have chosen to put the OneDrive local folder on the users’ home folder. One major added benefit to redirecting the OneDrive data is that it gives a systems administrator a simple way to back up a user’s OneDrive folder from the file server.
Before I get into the mechanics of how to make this work, we need to discuss some of the behavior of OneDrive. OneDrive uses the AppData local folder to place its configuration settings, update mechanisms, setup logs, and the executable itself. This means that we must use a UEM solution that will roam the local AppData folder to a file share to have a persistent user experience. I chose to use VMware Persona management and configured the Roam local option in the Group Policy.
In my process of testing I discovered that OneDrive uses an XML file to tell the application where to go get updates. These updates are problematic in non-persistent desktops because it will periodically pop up and tell the user to update. This is not ideal for non-persistent desktops and should be managed by the administrator from the golden image. I had to create a host file entry into the golden image to block the app from running updates whenever it felt like it. The host entry was simply “127.0.0.1 oneclient.sfx.ms”.
Another challenge isthat the OneDrive app automatically creates an entry in the registry to tell OneDrive to automatically start each time the user logs in. This didn’t give the automation logic enough time to make the needed changes before the app spun up. To stop this, I added some logic with the AppSense Environment Manager logoff trigger to remove the startup entry. I also do a check at Pre-Desktop to remove the entry before the rest of the process kicks off.
Now that we have all that out of the way. Let’s get started with how to make this all work. We’ll start with symbolic links.
What is a symbolic link?
A symbolic link (also symlink or soft link) is the nickname for any file or folder that contains a reference to another file or directory in the form of an absolute or relative path and that affects pathname resolution. Symlinks can be created very simply by using the mklink command in the command prompt.
We’ll be using two types of symlinks in order to make this work. The first will be regular directory link using “mklink /D C:\OneDrive H:\OneDrive”. The H drive is the users’ home folder. The OneDrive folder must exist in the H:\ drive before the mklink command can be run.
The second is a junction point. By default, the system doesn’t follow symlinks on remote volumes. This is needed to trick OneDrive into thinking that the folder is local. This symlink will point to the first directory symlink that points to the home folder location. To create this link we will use “mklink /J C:\One_Drive C:\OneDrive”.
Now that the links are set up and working we can change the default location of the OneDrive folder using the Group Policy.
OneDrive is now redirected to network share. Now what? Time to automate this behavior since this solution is meant for an automated non-persistent desktop pool. For that, I’ll go with my favorite tool of choice, AppSense Environment Manager.
Rerouting OneDrive User Profile to Shared Drive
There are some timing things to keep in mind when orchestrating this. The network drive that will be used for the OneDrive folder must be mapped prior to creating the symlinks. The OneDrive folder must also exist in the mapped network drive before the first symlink can be created.
The logic I used for this process is as follows:
Start by stopping OneDrive’s first-time setup from running at start by removing the OneDrive value from HKCU\ SOFTWARE\Microsoft\Windows\CurrentVersion\Run and then check to see if the H:\OneDrive folder exists. If this folder does not exist, then create the OneDrive folder in the root of the H:\ drive.
Next check if a symlink has already been created, then check to see if C:\OneDrive exists. If this folder does not exist, then create a new symlink using the mklink /D C:\OneDrive H:\OneDrive. After the first link has been created, the second link using the Junction point needs to be created. For that I use mklink /J C:\One_Drive C:\OneDrive.
Launch the OneDrive process by running %LOCALAPPDATA%\Microsoft\OneDrive\OneDrive.exe /background, then create a node in the Pre-Desktop trigger and name it Stop OneDrive Setup.
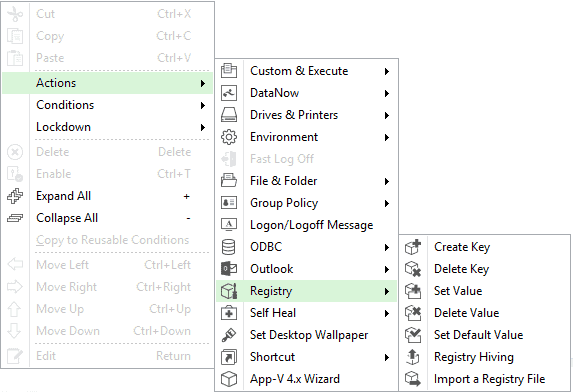
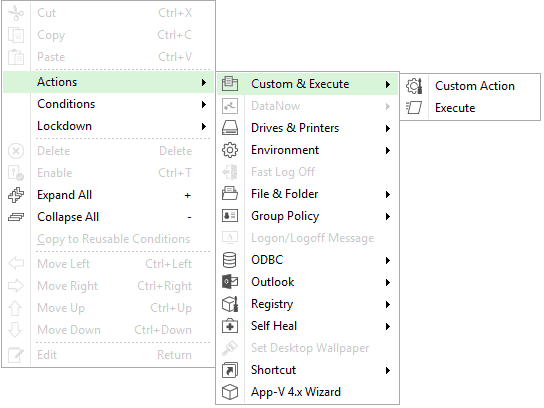
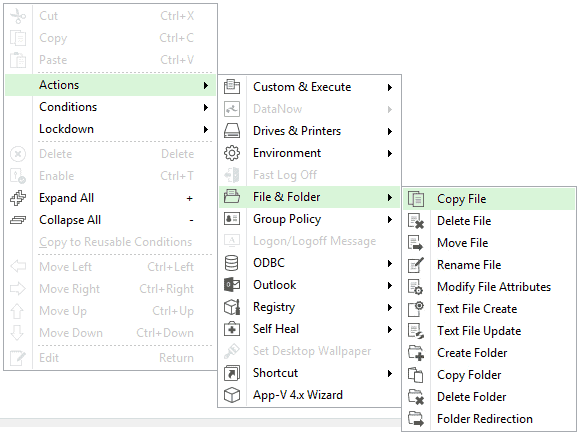
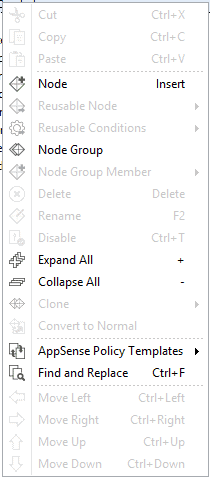
Create a new action by right clicking in the white space and selecting Actions > Registry > Delete Value:
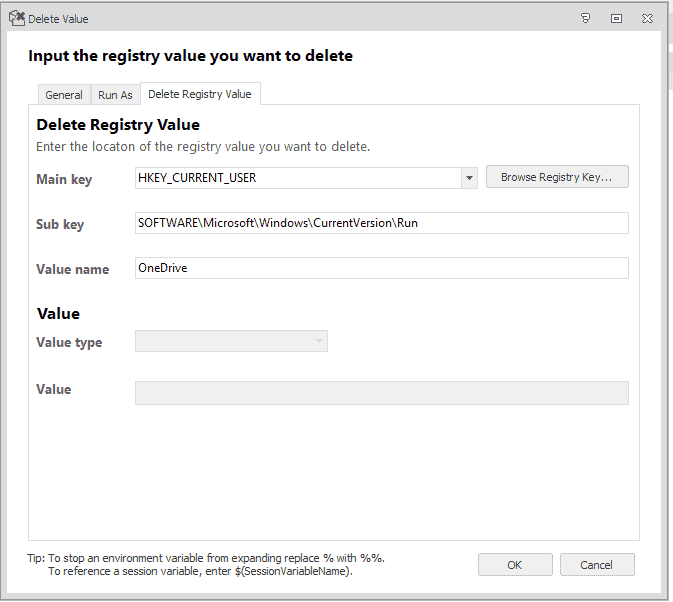
Next fill in the registry form with the following information:
Main Key: HKEY_CURRENT_USER
Sub Key: SOFTWARE\Microsoft\Windows\CurrentVersion\Run
Value Name: OneDrive
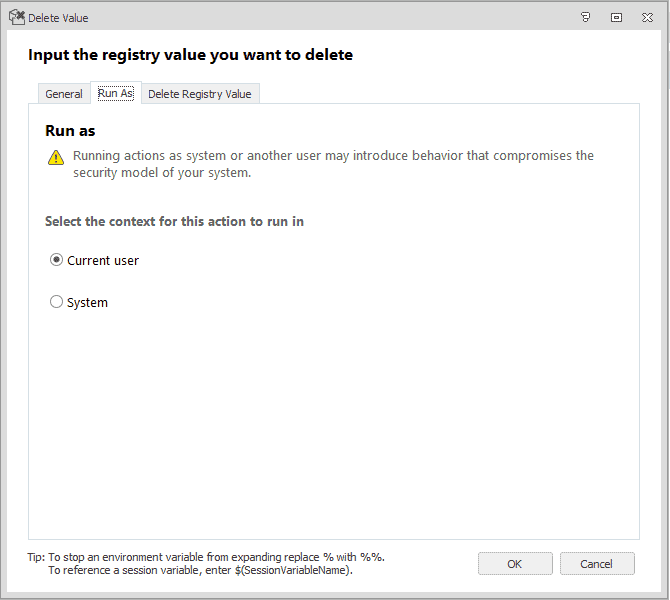
Set the Run As tab for current user.
You will also need to add this same logic to the Logoff trigger since the app will recreate the registry entry after it starts.
To do this, simply copy the action you just created by right-clicking on the action and selecting the copy option. From there create a new Node under the logoff trigger and name it “Remove OneDrive from Startup” then paste the action into the white space on the right.
![]()
![]()
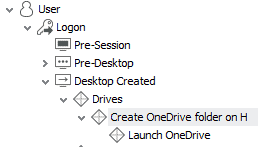
Next create a new sub node after the Drive mapping node under the desktop created trigger.
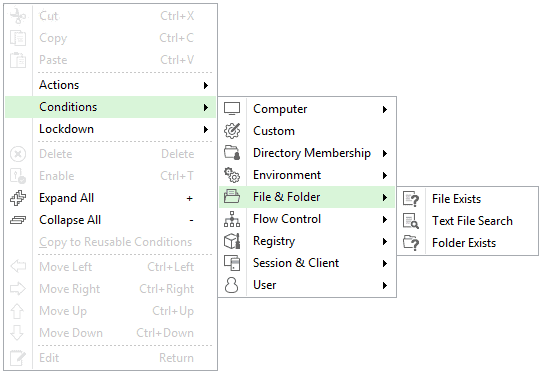
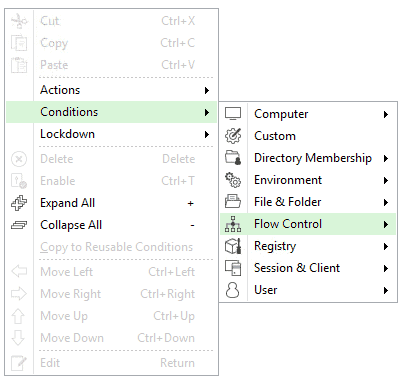
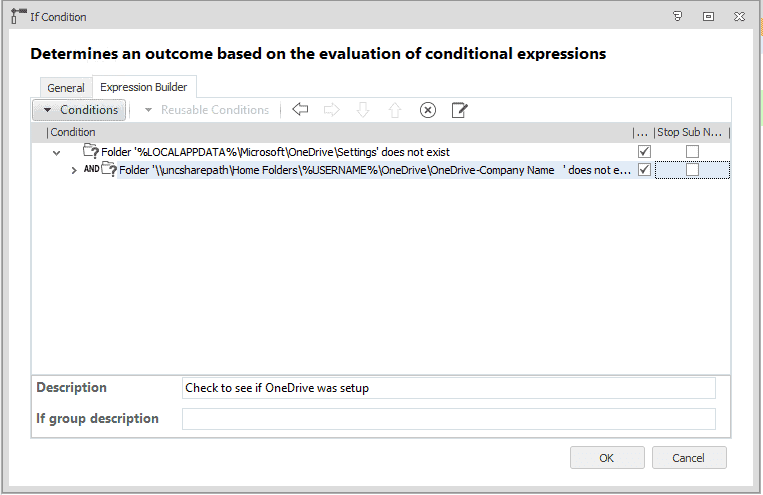
Right-click in the whitespace for the new node and select Conditions > Flow Control > If Condition:
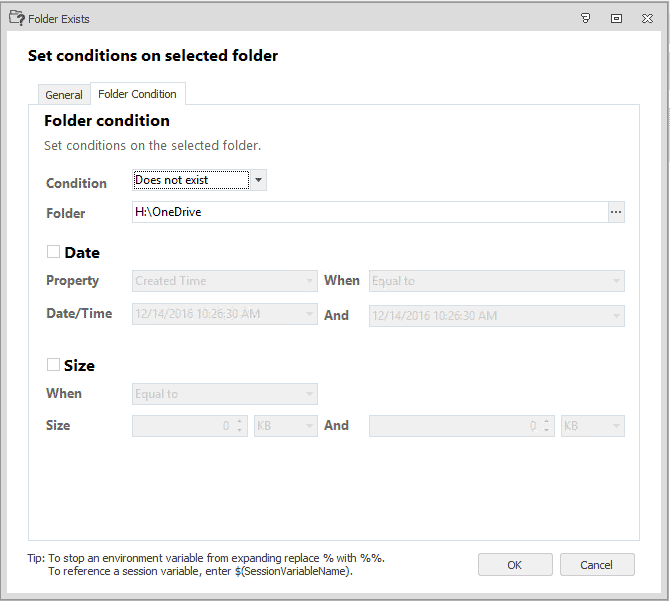
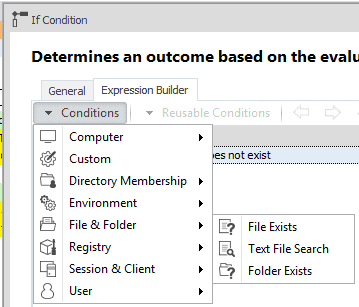
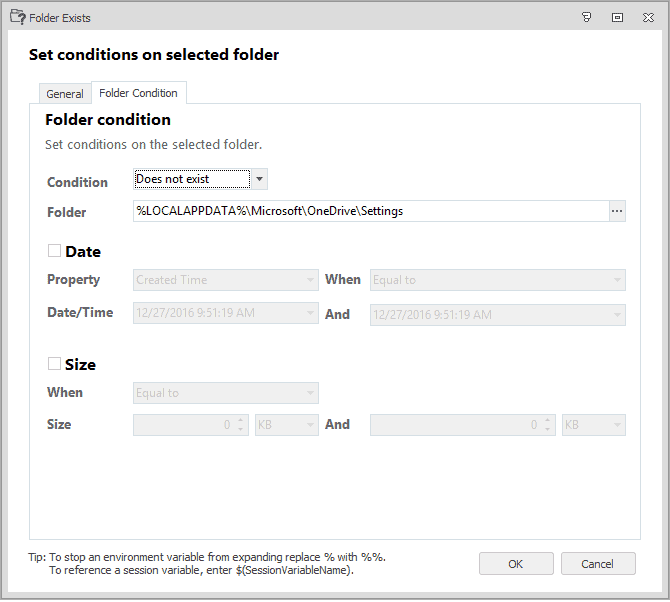
Now we need to define the first If statement in the flow control. We are going to check to see if the H:\OneDrive folder does not exist. Right-click on the if statement and edit. Then click on the conditions menu and select File & Folder > Folder Exists.
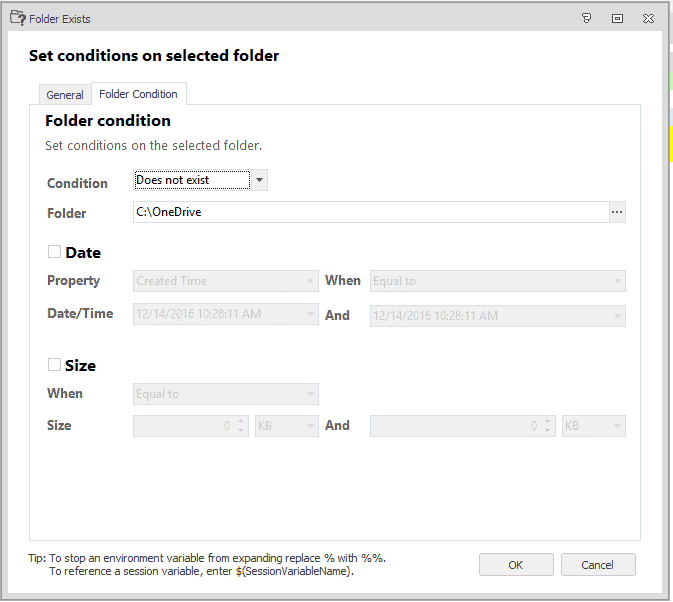
Select the following settings and click OK.
Condition: Does not exist
Folder: H:\OneDrive
Next create the action for creating the OneDrive folder in the root of the H:\ drive.
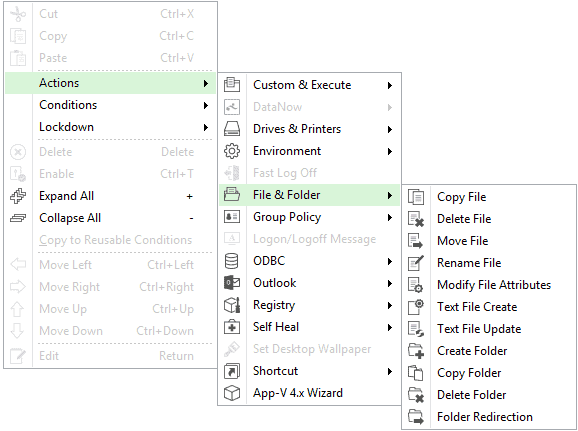
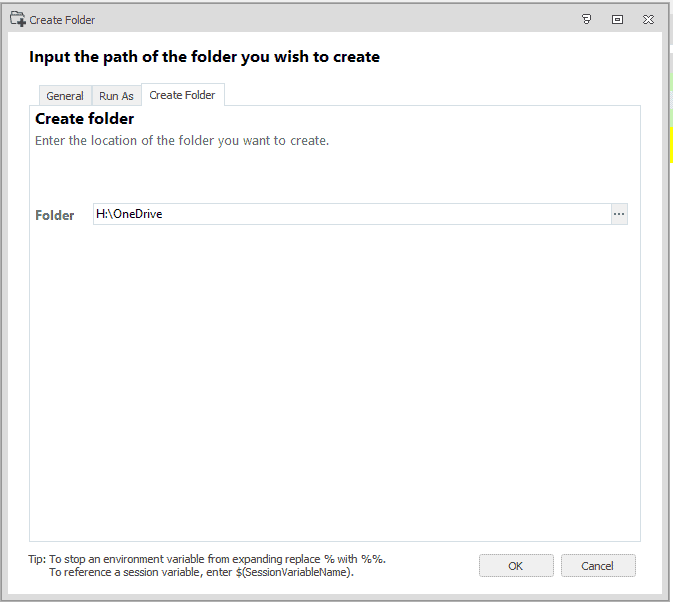
Right-click and select Actions > File & Folder > Create Folder.
Fill in the folder creation form with the following information:
Folder: H:\OneDrive
RunAs: Current User
Move the action to the right by right-clicking on the action and selecting the Move Right option.
Next check to see if the first symlink exists or not. Right-click in the white space and select Conditions > File & Folder > Folder Exists:
Fill in the folder exists form with the following information:
Condition: Does not exist
Folder: C:\OneDrive
Right-click on this condition and select move right option. From here we can create the actions to set up the symlinks. To do so, right-click in the white space and select Actions > Custom & Execute > Execute.
Fill in the form with the following information:
Filename: %SYSTEMROOT%\System32\cmd.exe
Working Directory: %SYSTEMROOT%\System32
Parameters: /c “mklink /D C:\OneDrive H:\OneDrive”
Check the checkboxes for “Do not execute children of this action until this process has exited” and “Do not create window”:
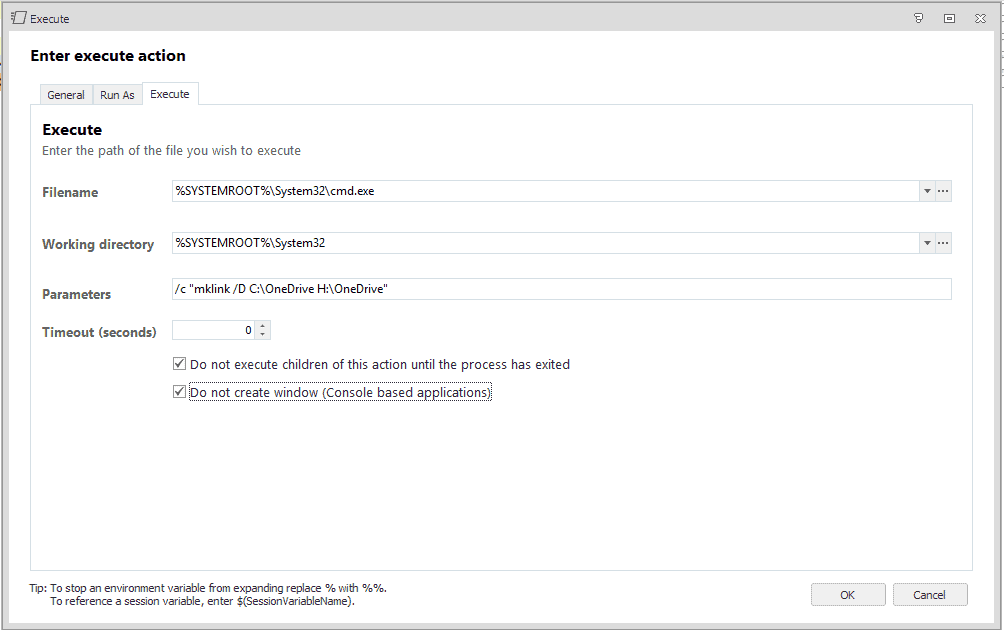
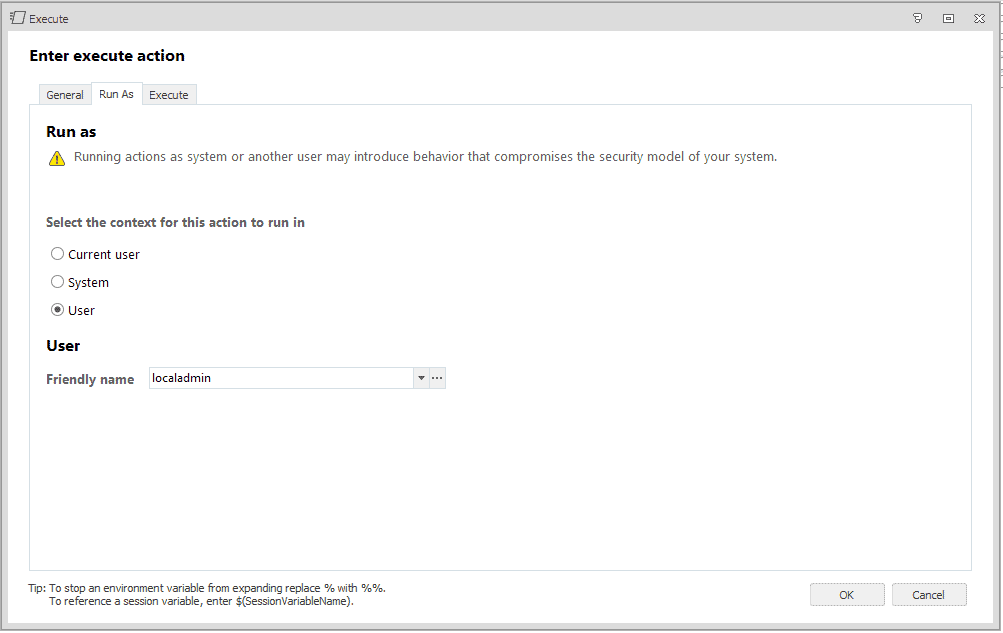
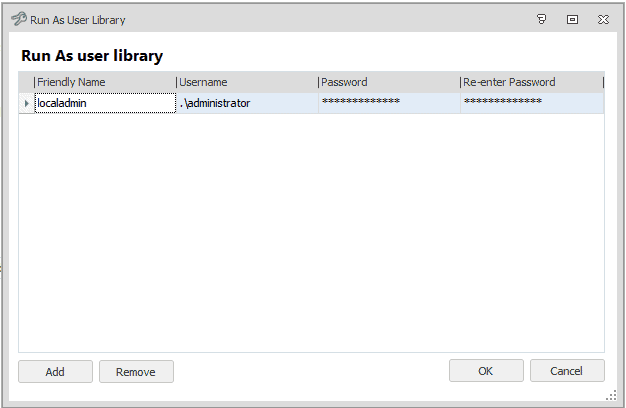
Set up the Run As information by selecting the User button on the Run As tab. From there, create a friendly name of local admin and set the username as .\administrator and provide the local admin password.
Right-click on the newly created action and select the Move Right option. Create the second symlink by right-clicking in the white space and select Actions > Custom & Execute > Execute.
Fill in the form with the following information:
Filename: %SYSTEMROOT%\System32\cmd.exe
Working Directory: %SYSTEMROOT%\System32
Parameters: /c “mklink /J C:\One_Drive C:\OneDrive”
Check the checkboxes for “Do not execute children of this action until this process has exited” and “Do not create window”:

Set up the Run As information by selecting the User button on the Run As tab. Create a friendly name of local admin and set the username as .\administrator and provide the local admin password.
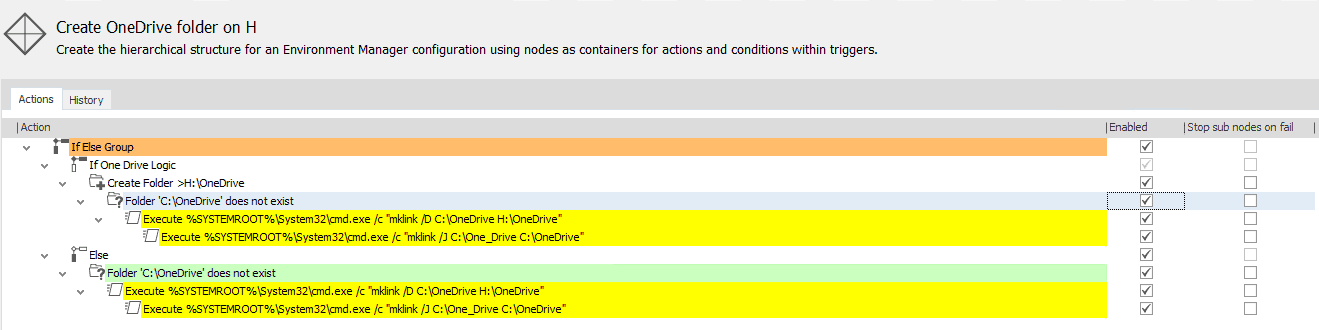
Right-click on the newly created action and select the Move Right option. Ensure that the “Stop sub nodes on fail” checkboxes are deselected. Next, build out the actions for the Else statement for the flow control logic. This logic can be copied by right clicking on the “Folder C:\OneDrive does not exist” action and selecting copy. Then you can paste actions into the Else statement.
The logic pane should look like this at this point:
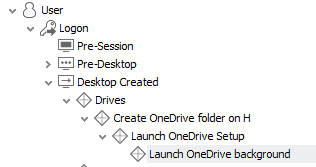
Create a new sub node under the “Create OneDrive folder on H” node and name it Launch OneDrive. It should look like this:
Right-click in the white space for the Launch OneDrive node and select Conditions > Flow Control > If condition:
Now, define the first If statement in the flow control. Check to see if the %LOCALAPPDATA%\Microsoft\OneDrive\settings folder does not exist. Right-click on the If statement and edit. Then click on the conditions menu in the Expression builder and select File & Folder>Folder Exists.
Select the following settings and click OK.
Condition: Does not exist
Folder: %LOCALAPPDATA%\Microsoft\OneDrive\settings
We need to add one more condition to this statement. Go to the condition menu and select File & Folder> Folder exists

Select the following settings and click OK.
Condition: Does Not Exist
Folder: This is the folder that is created in the OneDrive symlink path. You will need to run the setup once to get this full path.
Next right-click on the condition and select Move Right. You should see an AND condition just to the left of the condition.
The expression should look like this:
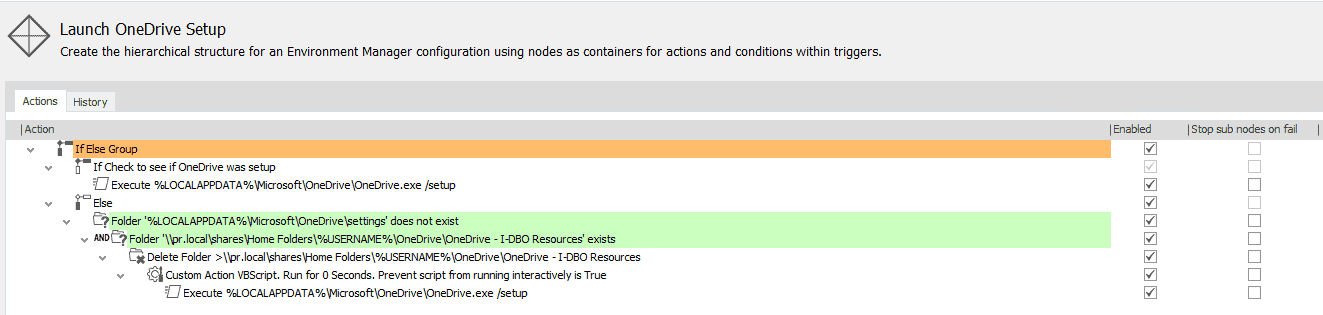
Now you can create the actions that will launch OneDrive setup if it doesn’t detect a pre-existing OneDrive configuration. If the conditions in the If statement are true, then that means OneDrive has not been set up or the AppData local folder is missing for whatever reason. This logic will cause the OneDrive to run its initial setup if it detects a missing AppData local folder or a missing OneDrive target folder.
Right-click under the first if statement and select Actions > Custom & Execute > Execute:
Fill in the form with the following information:
Filename: %LOCALAPPDATA%\Microsoft\OneDrive\OneDrive.exe
Working Directory: %LOCALAPPDATA%\Microsoft\OneDrive
Parameters: /setup
Run As: Current User
OneDrive will fail to re-launch the setup if it detects the OneDrive folder in the target path. In this case we will need to delete the existing OneDrive-Company name folder before launching the OneDrive setup again. We will do this in the Else condition. The logic will be determined as follows. If there is not a OneDrive AppData local folder and the OneDrive target folder exists, then it needs to remove the target folder prior to re-launching the setup action. Under the Else statement right-click and select Conditions > File & Folder > Folder Exists.
Select the following settings and click OK.
Condition: Does not exist
Folder: %LOCALAPPDATA%\Microsoft\OneDrive\settings
Now you will need to add the second condition by right-clicking below the first condition and selecting Conditions > File & Folder > Folder exists.
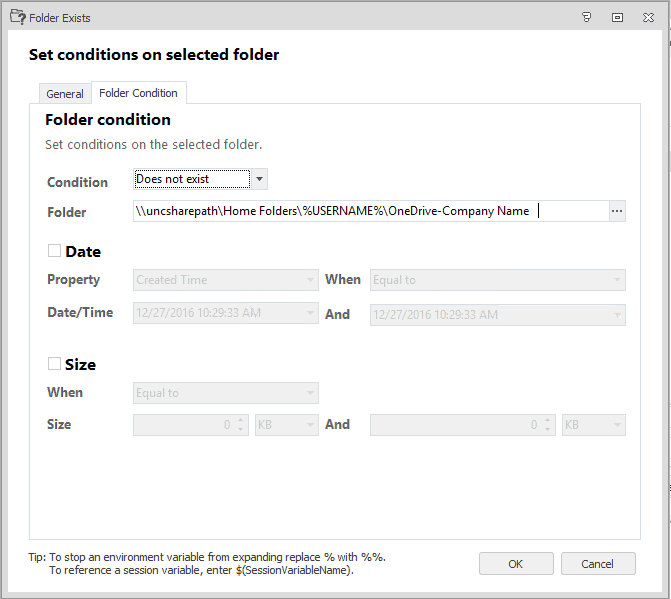
Select the following settings and click OK.
Condition: Exists
Folder: \\uncsharepath\Home Folders\%USERNAME%\OneDrive\OneDrive-Company Name
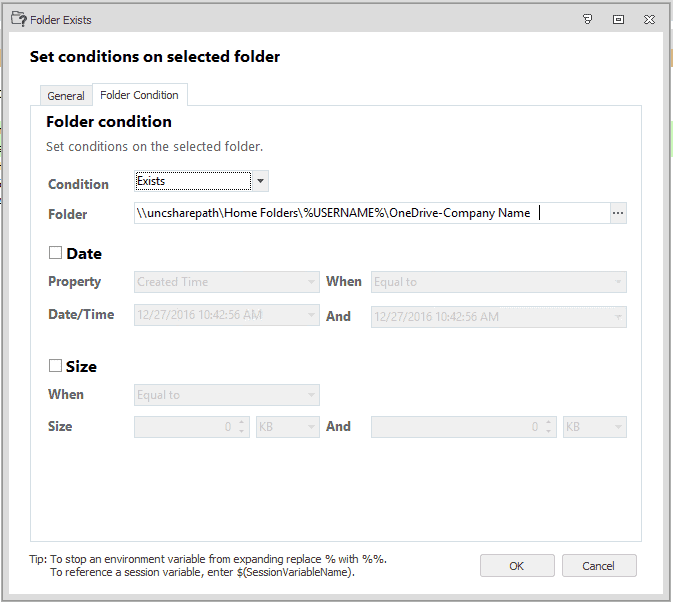
Now you will need to right-click on the second condition and select move right. You should see an AND next to the two conditions. It should look like this at this point:

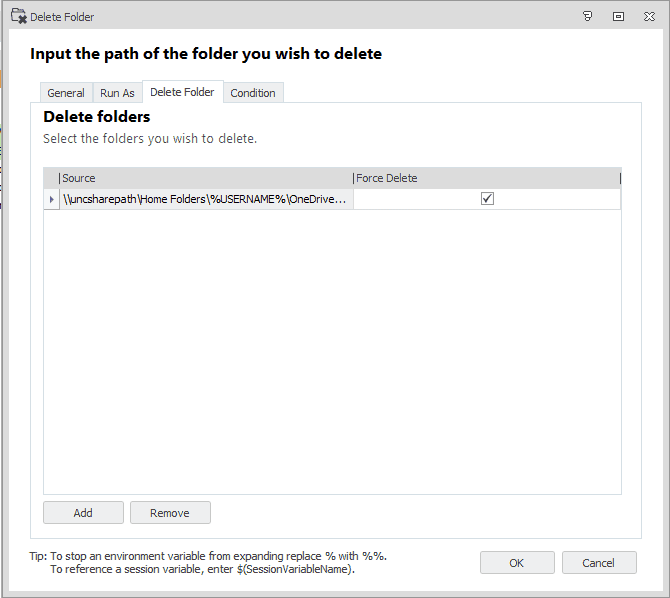
Next you will need to remove the target folder if the Else statement is True. To do this, right-click under the conditions and select Actions > File & Folder >Delete Folder.
Use the following settings and click OK:
Source: \\uncsharepath\Home Folders\%USERNAME%\OneDrive\OneDrive-Company Name
Click the Force Delete checkbox.
Run As: Current User
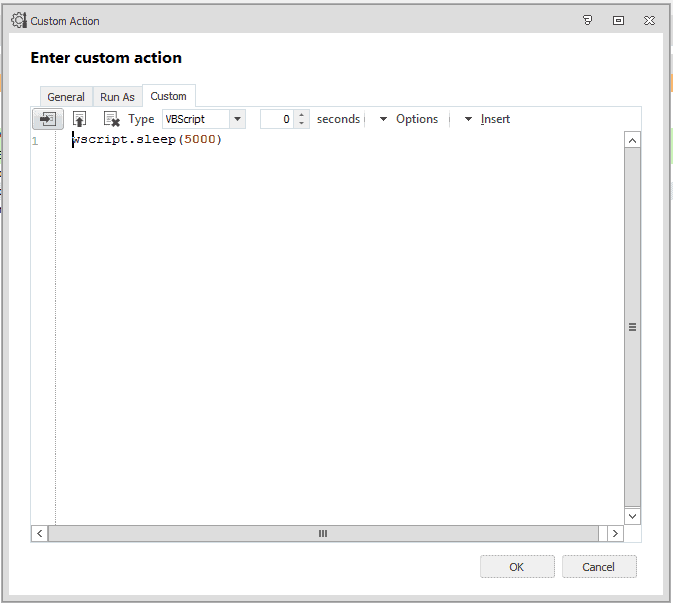
Next you will right-click on the Delete folders action and select “Move right”. Add a wait timer of five seconds and launch the OneDrive Setup. To do this I add a wscript.sleep action using a custom vbscript action. Right-click under the Delete Folder action and select Actions > Custom & Execute >Custom Action.
Select the VbScript option from the drop down and add Wscript.sleep(5000) to the text area and then select OK. Leave the Run As at defaults.
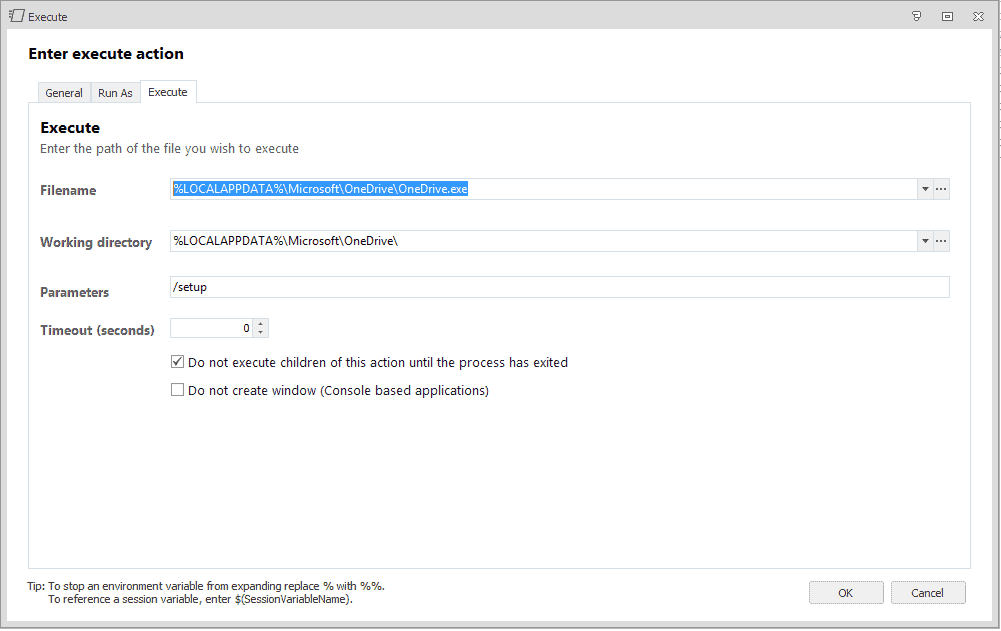
Next you will want to right-click on the new action and select Move Right. From there you can add the action to launch the OneDrive setup. Right-click below the last action and select Actions > Custom & Execute > Execute.
Fill in the form with the following information:
Filename: %LOCALAPPDATA%\Microsoft\OneDrive\OneDrive.exe
Working Directory: %LOCALAPPDATA%\Microsoft\OneDrive
Parameters: /setup
Run As: Current User
Right-click on the new action and select Move Right.
The pane should now look like this:
Next we will need to create another node under the Launch OneDrive Setup node and name it Launch OneDrive background. This will be here to launch OneDrive during normal conditions.
The node structure should look like this now:
Right-click in the blank space on the new Launch OneDrive Background node and select Actions > Custom & Execute > Execute.
Fill in the form with the following information:
Filename: %LOCALAPPDATA%\Microsoft\OneDrive\OneDrive.exe
Working Directory: %LOCALAPPDATA%\Microsoft\OneDrive
Parameters: /background
Run As: Current User
Save the configuration and deploy to a group of test machines.
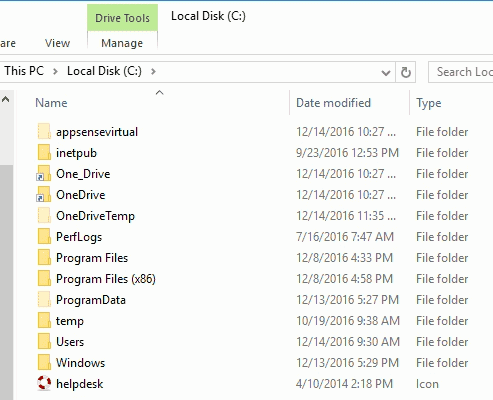
You will know this worked when you open file explorer and see the folders on the C drive.
Finally you will need to make sure that the GPO has been applied for the machines and set the default location to the C:\One_Drive folder. Also, select the option in the Group Policy to disallow the user to change the default location.
More information on configuring the OneDrive GPO can be found here.